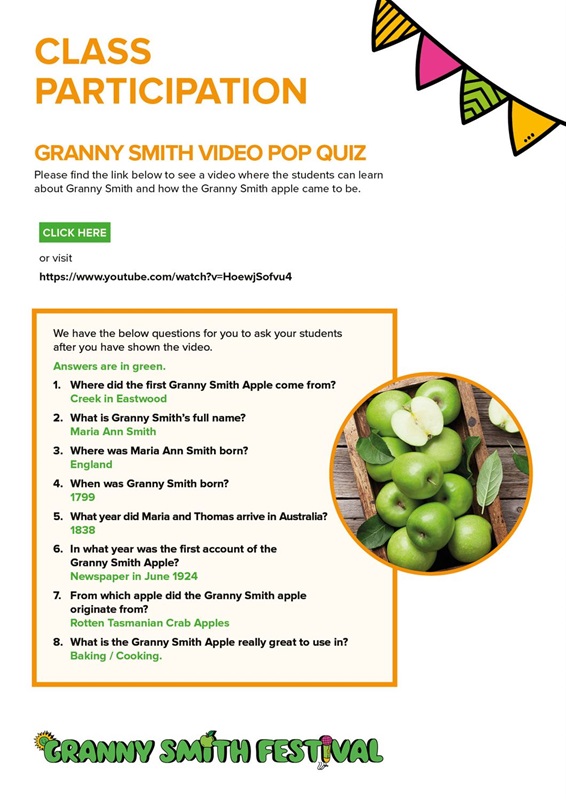
Download the pdf by clicking the image below which includes a link to a video about Granny Smith and how the Granny Smith apple came to be and then answer the quiz!
Materials
- small paper plate
- pom poms: red, white and green
- small black pom poms
- glue
- craft stick
Steps
Source: https://nontoygifts.com/paper-plate-pom-pom-core-apple-craft
Materials
- apple sliced in half
- paint
- sheets of paper
Steps
- On a sheet of paper, only draw a caterpillar’s head
- With half an apple, dip the apple onto coloured paints
- Stamp a body next to the caterpillar’s head
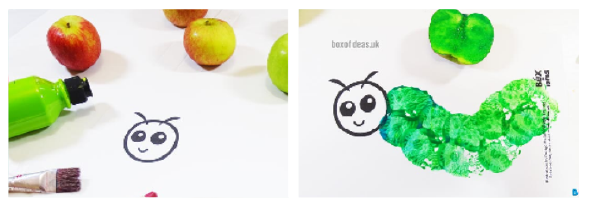
Source: https://www.boxofideas.com/apple-stamping-activity
Materials
- Green and Red Yarn
- Green Felt
- Twine
- Scissors
- Glue
Steps
- Begin by wrapping some yarn around two fingers
- Keep wrapping the yarn around your fingers, about 100 times. It sounds like a lot but it only takes a minute!
- Carefully slip the looped yarn off your fingers.
- Tie a piece of twine (about 3 inches) around the center of the looped yarn.
- Fluff out the yarn to make it a round apple shape. Next, cut some small leaves out of green felt.
- Glue a leaf to the top of the apple with a dot of glue.
Source: https://www.thebestideasforkids.com/yarn-apple-garland/
Materials
- Small red paper plates
- Green and brown construction paper
- Scissors
- Tape or glue
Steps
Source: https://kidsactivitiesblog.com/90482/easy-paper-plate-apple-craft-kids
Materials
- Pinecone
- Green yarn
- Red pompoms
- Glue
- Scissors
Steps
- Wrap green yarn around your pinecone numerous times
- Cut off the end of the yarn and tuck it in
- Glue red pompoms onto your pinecone tree to represent apples
Source: https://buggyandbuddy.com/pinecone-apple-tree-craft
Materials
- 1 Apple
- A Sheet of White Card
- Red and Green Paint
Steps
- Use a pencil to draw around the outside of your child’s hand and arm
- Cut an apple in half
- Either dip the apple into the paint or use a paint brush to cover the surface
Source: https://www.artycraftykids.com/art/handprint-apple-tree
Materials
- A mix of red and green buttons
- White school glue
- Wooden board or cardboard paper
- Chalk
- Paper and pencil
Steps
- Use the paper and pencil to create an apple stencil for kids
- Fill in the apple stencil with white glue Place buttons on the glue to form the shape of an apple
Source: https://kidsactivitiesblog.com/94889/apple-button-art-kids
Materials
- Coffee filter paper
- Spray bottle filled with water
- Apple-coloured markers (we used red, green, and yellow)
Steps
- Use markers to colour in the coffee filter
- Use the water bottles to spray to get their coffee filters wet
- The marker ink will begin to separate and spread throughout the entire coffee filter in a beautiful process
- Leave coffee filters to dry overnight.
- Then cut them to the shape of our apple outlines and taped them to the back for a beautiful finish
Source: https://www.giftofcuriosity.com/apple-craft-with-coffee-filter
(More advanced although quiet creative and useful)
Materials
- Plastic 1-1.5L bottles
- Spray paint in red and green
- Zipper in red and or green
- Hot gun and glue
Steps
- First cut the bottoms off the bottles and make sure they are clean and dry
- Then spray paint the inside of the bottle bottoms with red and or green, tape the outside of the bottle bottoms with painters tape so you don’t get spray paint on the outside surface. You will need to apply several coats to achieve an even coat. Wait a couple minutes between paint coats.
- When the paint is dry, remove the blue painters tape and fire up your hot glue gun! You will glue the zipper to the outside rim of the bottles
- Use cardboard to cut-out a stem and green card stock for a paper leaf. The stem is hot-glued on and the leaf is tied onto the stem with yarn
Source: https://www.repeatcrafterme.com/2012/09/plastic-bottle-apple-containers.html
Materials
- Flour
- Water
- Red and green paint
- Sticks for the apple stems
Steps
- Mix 2 cups of flour with one cup water. If your mixture is too wet just throw in a little more flour. (You want it squishy). Knead the dough in your hands for a few minutes
- Separate the dough into five pieces. Roll 4 large pieces into balls to make the apples. The 5th piece should be much smaller for your leaves
- Form the 5th piece into a long, flat oval. Cut this piece into 4 small pieces. Shape them into leaves. With a butter knife slice little veins into the leaves
- Paint the apples using red or green (for granny Smith apples)
- Once the pieces are dry you can use twigs for a stem
*You can also use red and or green playdough
Source: https://www.weknowstuff.us.com/2010/09/a-is-for-apple.html
Materials
- Large Paper Plate
- Red {or green} Tissue Paper
- School Glue
- Scissors
- Colored Cardstock
- Brown/Green Craft Paint
- Stapler
Steps
- Cut your tissue paper into small squares
- Paint glue all over the paper plate
- For the stem/leaf of the apple, use your hand print on card stock. Then let the paint dry
- Trim out the handprint and staple to your paper plate, to give the look of an apple
Source: https://www.gluedtomycraftsblog.com/2014/08/tissue-paper-apple-kid-craft.html
Materials
- paper plate
- hole punch
- red yarn
- brown and green paper
- scissors
- glue
Steps
- Punch holes all around the outside of your paper plate, Try to make them as evenly spaced as possible
- Take a long piece of red yarn and begin lacing through the holes
- Once your apple is complete, cut a rectangle of brown paper for the stem as well as a leaf shape out of green paper
- Glue the paper stem and leaf together, then glue on the back of the plate
Source: https://ourkidthings.com/apple-paper-plate-lacing-craft
Materials
- Different colored pipe cleaners (red, green and brown)
Steps
- Shape a red or green pipe cleaner the shape of an apple
- Attach a brown colored pipe cleaner as the stem
- attach a green pipe clear as the leaf
- these can be used to hang as decorations on door knobs at home, hang them in the classroom or play ring toss game using empty glass bottles
Source: https://www.makeandtakes.com/pipe-cleaner-apples
Mosaic Apples
Material
- Paper in different colours – red, green and brown
- Pair of scissors
- Glue
Steps
- cut the red or green paper into small squares
- trace a shape of an apple on a piece of paper
- glue pieces of colored paper on the template made
Material
- Paper
- Pipe cleaners x4
- googly eyes (optional)
- scissors
- Colored paper
- Hole puncher
Steps
- on a piece of paper, draw sweetie pie or download a template off the internet
- Color in Sweetie Pie as creative as you like
- Cut out sweetie Pie using a pair of scissors (make sure you have parent supervision)
- using a hole puncher, create 1 hole on either side of Sweetie Pie (for arms) and 2 on the bottom (for legs)
- Thread through the pipe cleaners on each hole
- Glue google eyes, or you can simply draw Sweetie Pie’s eyes
Source: https://www.firefliesandmudpies.com/harvestbuddies
This craft may also be a little advanced but with supervision it could be a fun activity
Materials
- white chenille stems (1 chenille stem/apple)
- faceted plastic beads
- cookie sheet
- parchment paper
- scissors and wire cutters
- fishing line
Steps
- String 1 chenille stem with your choice of beads
- On one end of the chenille stem, string 3 green beads to create a stem. Bend the chenille stem into the shape of an apple
- Twist and tuck the ends of the chenille stems into each other to secure the shape of your apple
- Place the beaded apple onto a parchment lined cookie sheet. Fill in the entire shape with loose bead
- Place the cookie sheet into a cold oven and set for 350º. After the oven has reached the proper temperature, set the timer for 10 minutes. After 10 minutes, the beads should be fused together. Turn off the oven and allow the cookie sheet to cool inside of the oven
- When the suncatchers are cool, string a piece of fishing line through them. Hang and enjoy!
Source: https://www.firefliesandmudpies.com/apple-suncatchers